pdf格式的文档: 下载
ALPHA1 i.MX 95 Quickstart Guide |
|
文档标题 |
ALPHA1 i.MX 95 Quickstart Guide |
文档类型 |
Quickstart Guide |
型号 |
ALPHA1 |
Yocto 手册 |
Scarthgap |
发布日期 |
2025/06/02 |
母文档 |
ALPHA1 i.MX 95 Quickstart Guide |
下表显示了与本手册兼容的 BSP:
适用BSP |
BSP 发布类型 |
BSP 发布日期 |
BSP 状态 |
|---|---|---|---|
BSP-Yocto-NXP-i.MX95-ALPHA1 |
Alpha |
2025/06/02 |
已发布 |
1. 介绍
This Quickstart guide describes the tools and provides the know-how to install and boot the Linux Board Support Package (BSP) for the phyCORE-i.MX95 FPSC Kit.
This kit is currently in Alpha Status. There are several topics to keep in mind while working with this kit and guide:
The phyCORE-i.MX95 FPSC will go through several functional changes during the Alpha Stage of development. Due to this, this Quickstart guide may change without any prior notice.
The phyCORE-i.MX95 FPSC has some functionality that is not currently operational. Please be aware of this when working with the Alpha Kit.
This Quickstart guide is only for booting and starting the basic functionality of the phyCORE-i.MX95 FPSC.
Hardware manual for the phyCORE-i.MX95 FPSC can be found here: Hardware Manual - phyCORE-i.MX 95 FPSC/Libra Development Board (1620.1/1618.0) (L-1075e.A1)
Yocto Reference Manual for scarthgap can be found here: Yocto Reference Manual (scarthgap)
BSP Manual for phyCORE-i.MX95 FPSC can be found here: i.MX95 ALPHA1 BSP Manual
The following manuals will be available in future releases of the phyCORE-i.MX95 FPSC:
Pin Muxing Table - a complete list of all signal chains from processor to carrier board output. Signal level, signal type, and other useful information is also included.
For more information or details regarding the phyCORE-i.MX95 FPSC, please contact the PHYTEC Sales department.
2. Requirements
2.1. Included in the Kit
Alpha phyCORE-i.MX 95 FPSC SOM on Alpha Libra Development Board (PD-05032-ALPHA.A0)
Power adapter supplying 24 V / 3,75 A (SV071)
Ethernet cable (WK114)
USB-A to USB-C cable (WK560)
SD Card with prepared prebuilt images
2.54 10P to DB9P Female (WF072)
2 x 2.54 10P to DB9P Male (WF228)
2.2. Components
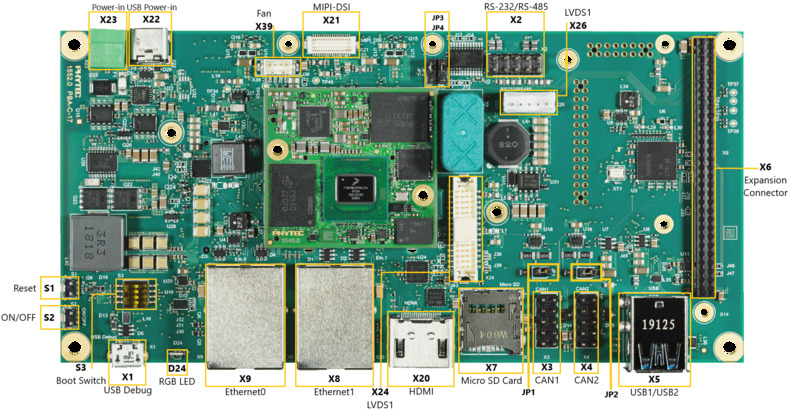
Libra FPSC Components (top)
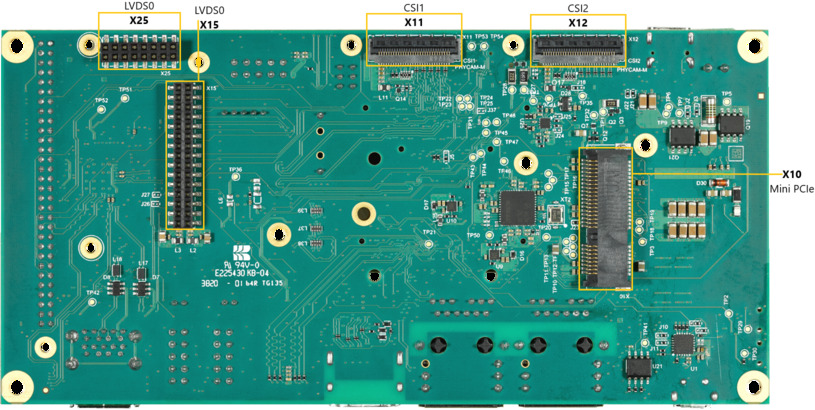
Libra FPSC Components (bottom)
警告
As this is an Alpha Kit, there will be continuous revisions being made to the phyCORE-i.MX95 FPSC SoM and Libra FPSC board. Due to this, components and features may not be available. Contact PHYTEC if there any questions regarding components and features for this Alpha Kit. To see which components are currently functional, refer to the phyCORE-i.MX95 FPSC release notes.
2.3. Additional (optional) equipment (not included in Alpha Kit)
Display (KLCD-AC209-IMX95)
Embedded Imaging Kit (KPB-xxxx-Video-L01, KPB-xxxx-Video-L02)
2.4. Linux Host PC
Before you can work with the phyCORE-i.MX95 FPSC Board Support Package (BSP), you will need a host PC with the following minimum requirements:
A modern Linux operating host system either natively or via a virtual machine.
Ubuntu 22.04 LTS 64-bit recommended. Other distributions will likely work but note that some setup information as well as OS-specific commands and paths may differ.
VMWare Workstation, VMWare Player, and VirtualBox are possible solutions if you want to use a virtual machine.
Root access to your Linux host PC. Some commands in this guide will not work if you do not have sudo access (e.g. package installation, formatting an SD card).
At least 40 GB to 50 GB of free space on the build partition of the host PC.
An SD card reader, operational under Linux.
An active internet connection.
3. Connecting the Board
There a few manual connections that you will need to make before using the Libra FPSC.
3.1. Connecting the DEBUG USB interface
For the following steps, a console connection via USB is required. You can use the included USB Type-A to USB Type-C cable.
备注
For convenience, we have added a board UART to USB converter. This means, no RS232 interface is required during development for console communication between our carrier board and your host PC.
Connect your PC's USB port with the USB-C connector of the Libra FPSC (X14). After plugging the USB-C cable into X14 a red LED (D12) will light up to indicate a present USB bus voltage.
Your device manager will show four new COM ports. Select the first COM port. On the processor side, UART3 is the default debug UART of the A55 Cores. The second COM port is the debug UART for the M7 core. This equals to UART4 on the processor side.
警告
Do not open the third or fourth COM port in a terminal program! With the third COM port a reset of the board can be triggered. With the fourth COM port the bootmodes can be set. Opening these COM ports can lead to boards not booting. This feature is not fully functional yet.
- Setup your Terminal with the following parameters:
Speed: 115200 baud
Data bits: 8
Stop bits: 1
Parity: None
Flow control: None
3.2. Powering the Board
We recommend powering the Libra FPSC with the power supply (SV055) included in the kit. Connect the power supply to the Power-In connector (X8).
警告
If you are using a power adapter other than the one provided, please note the polarity of the power component X8. Ensure that your power adapter is correctly set up to use the polarity as shown below.
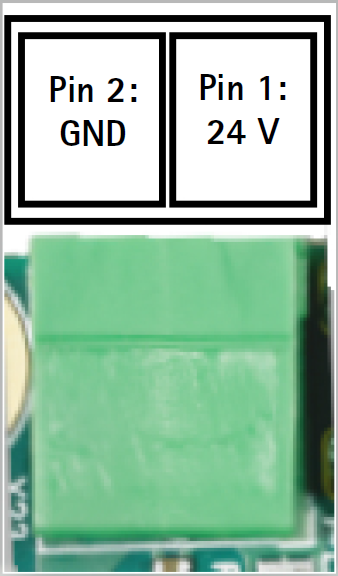
It is possible to power the Libra FPSC with a USB-PD (USB power-delivery) supply instead of the power supply SV055. Connect a conform USB-PD supply to USB-C connector X2 right next to Power-In connector X8.
警告
Do not power the Libra FPSC via USB Power-In (X2) and Power-In (X8) at the same time.
小技巧
Be aware that as soon as the Libra FPSC is supplied with power, the SD Card boot sequence will begin. Ensure that all cables are connected to the board!
4. Prebuilt Images
PHYTEC provides prebuild images and release notes for the phyCORE-i.MX95 FPSC. They can be downloaded here: https://download.phytec.de/Software/Linux/BSP-Yocto-i.MX95/BSP-Yocto-NXP-i.MX95-ALPHA1/images/ampliphy-vendor/imx95-libra-fpsc-1/
There are three images available phytec-qt6demo-image, phytec-headless-image and phytec-vision-image.
5. System Booting
The phyCORE-i.MX95 FPSC Kit is shipped with a pre-flashed SD card. It contains the phytec-qt6demo-image and can be used directly as a boot source.
The Quickstart guide will only describe how to boot from the pre-flashed SD card. How to build the BSP yourself, flash your own SD card or boot from other bootsources like eMMC is described in the i.MX95 ALPHA1 BSP Manual.
5.1. Boot with SD-Card
To boot from an SD card, the bootmode switch (S1) needs to be set to the following position:
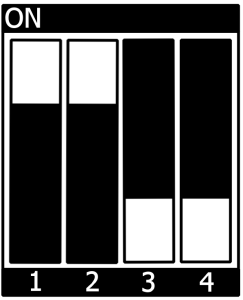
插入SD卡
Connect the target and the host with USB-C on (X14) debug USB
给开发板通电