User Management
This guide walks you through everything you need to know to set up and manage your team’s access to phyHUB. It covers creating your organization, inviting colleagues, assigning the right roles, and keeping access up to date over time.
How It Works – A Quick Overview
phyHUB uses organizations to keep each company’s users and data completely separate. Every organization has an Organization Admin – the first person to register – who is responsible for managing all team members within that organization.
A few important things to know upfront:
Note
Users cannot sign up on their own. The only way to join a phyHUB organization is to be invited by the Organization Admin. This is by design, to keep your workspace secure.
The overall flow looks like this:
Admin registers organization
Admin verifies email & logs in
Admin invites colleagues (one by one, with a role)
Colleagues receive an email
Accept invite
Set a password
Access phyHUB
Part A: Setting Up Your Organization
This section is for the person who has been designated as the Organization Admin and has received a registration link from the phyHUB team.
Step 1: Open the Registration Link and Fill In Your Details
Click the registration link https://www.phyhub.phytec.de/auth/register-organization. You will land on the Register Organization page.
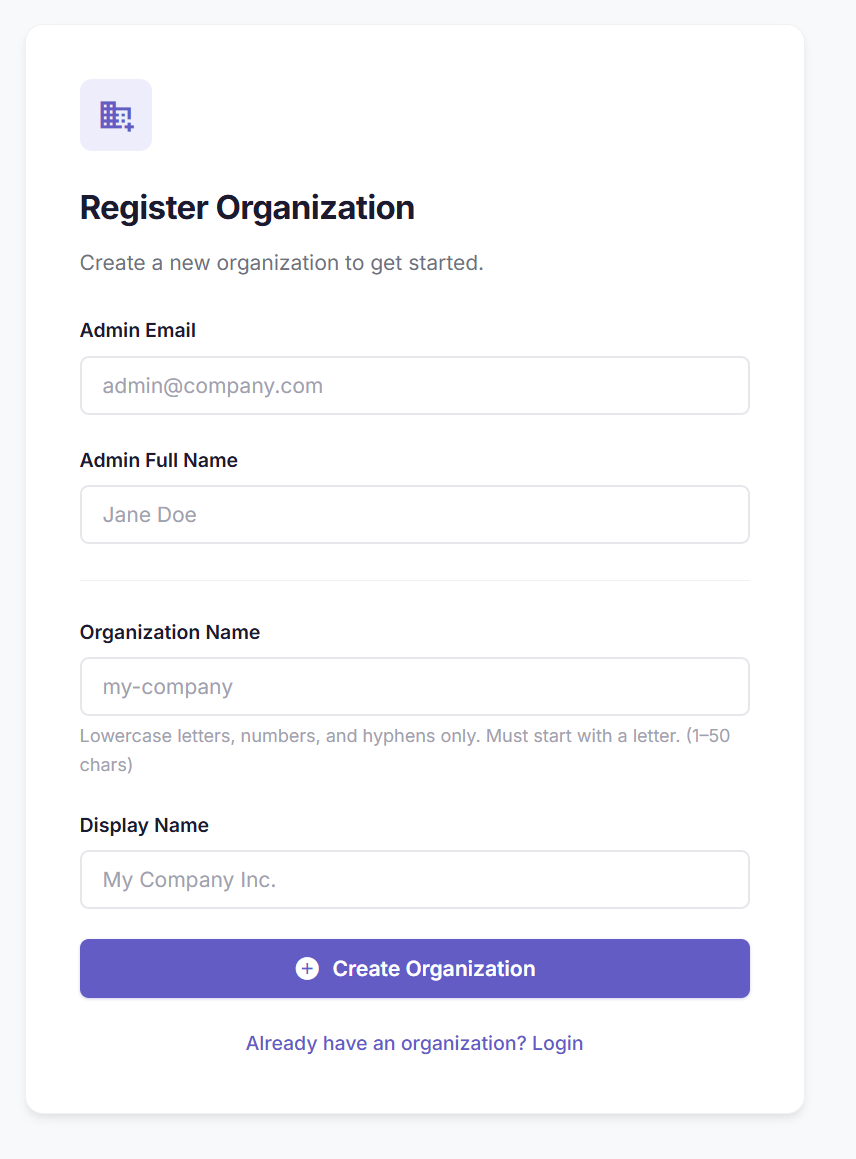
Fill in all four fields:
Field |
What to enter |
|---|---|
Admin Email |
Your work email address. This becomes your login. |
Admin Full Name |
Your first and last name. |
Organization Name |
A short, URL-friendly identifier for your company
(lowercase letters, numbers, and hyphens only;
1–50 characters; must start with a letter). Example:
|
Display Name |
The human-readable name of your company.
Example: |
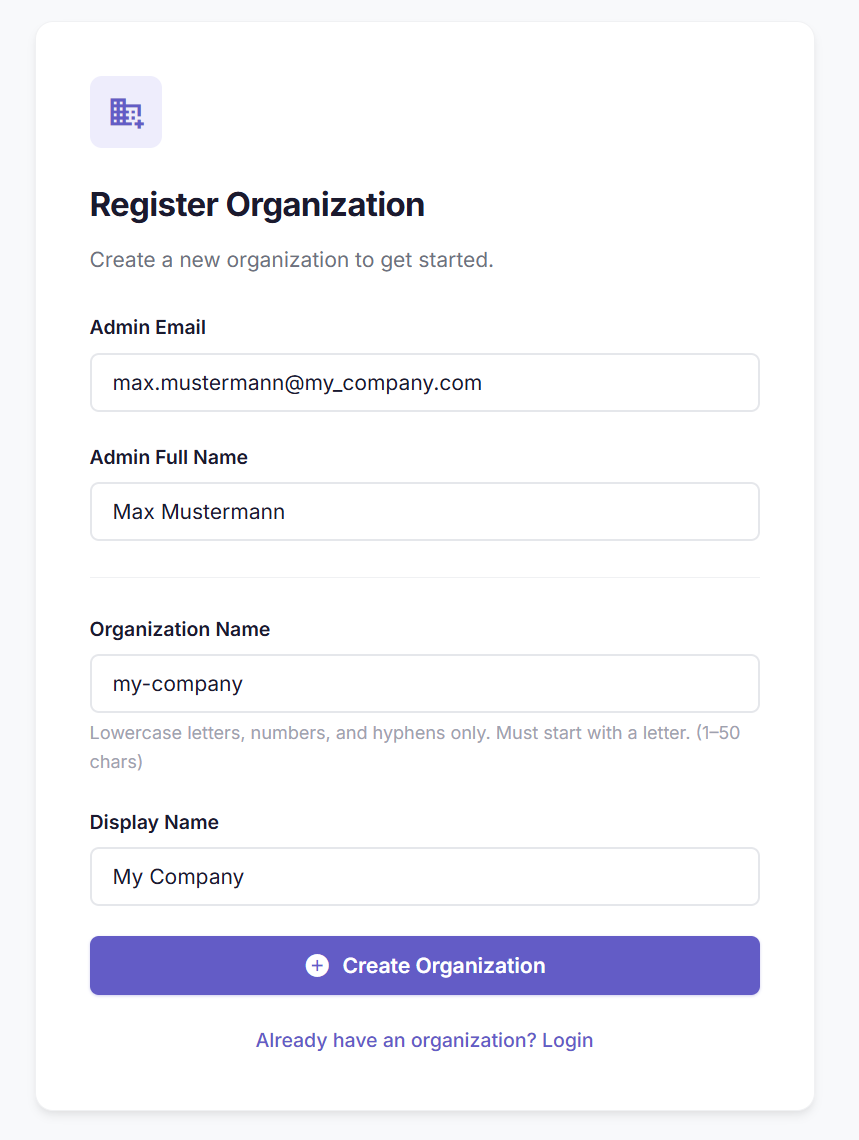
Once everything looks good, click + Create Organization.
Step 2: Verify Your Email Address
After submitting the form, phyHUB will send a verification email to the address you entered.
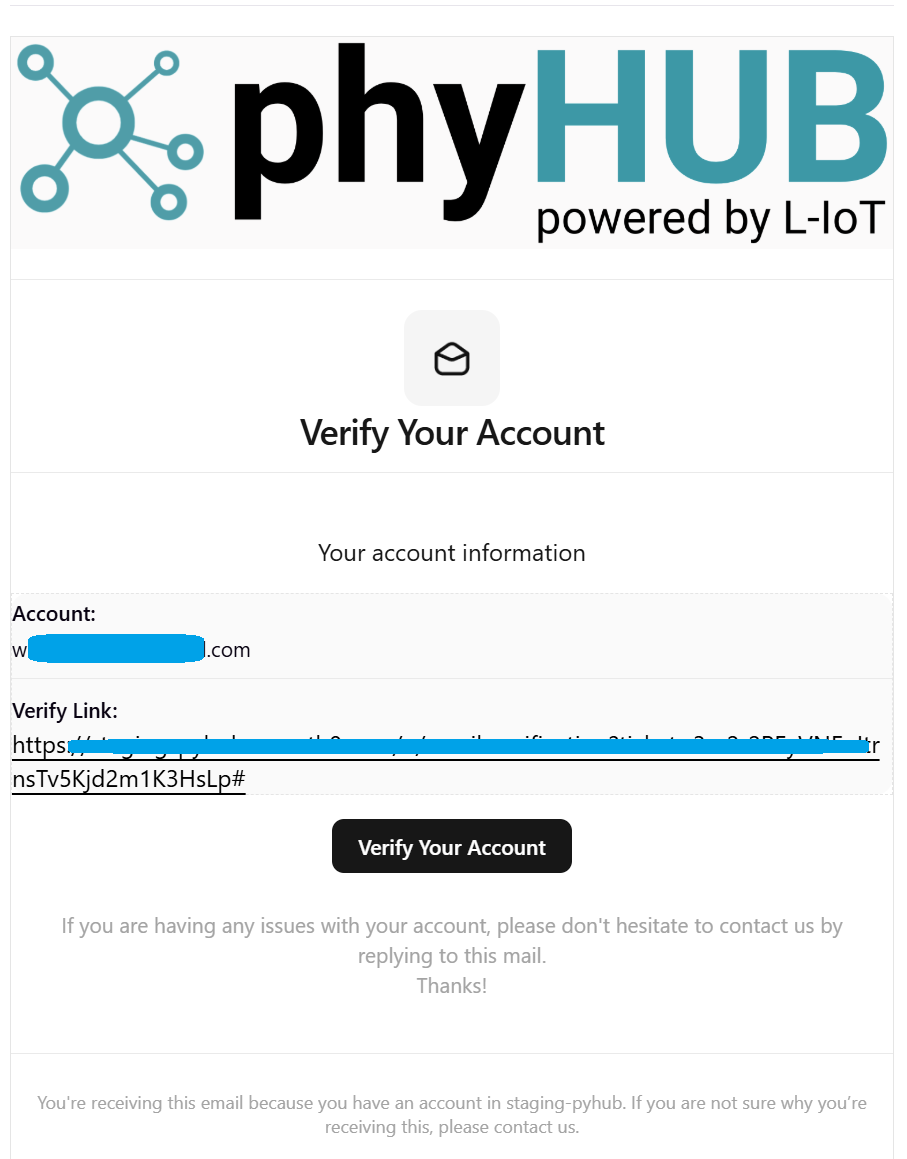
Open the email and click Verify Your Account. This confirms that your email address is valid and activates your account.
Tip
If you don’t see the email within a few minutes, check your spam or junk folder. If it still hasn’t arrived, see the Troubleshooting section at the end of this guide.
Step 3: Set Your Password
After verifying your email, you will be prompted to set a password for your account.
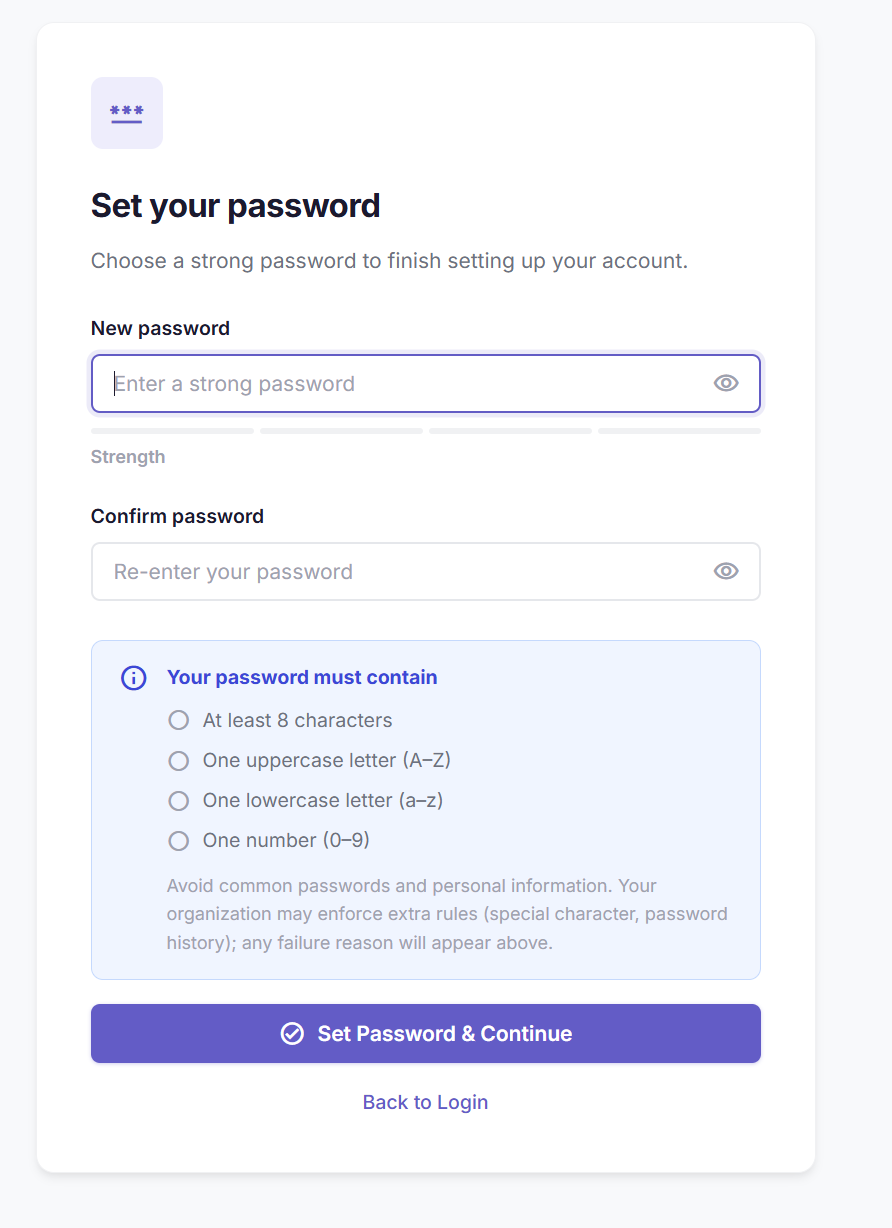
Your password must meet the following requirements:
At least 8 characters
At least one uppercase letter (A–Z)
At least one lowercase letter (a–z)
At least one number (0–9)
A strength indicator will help you gauge how secure your password is. Enter it twice to confirm, then click Set Password & Continue.
Step 4: Log In to the Organization Dashboard
You are now logged in for the first time. Welcome to the Organization Dashboard – this is your control center for managing your team.
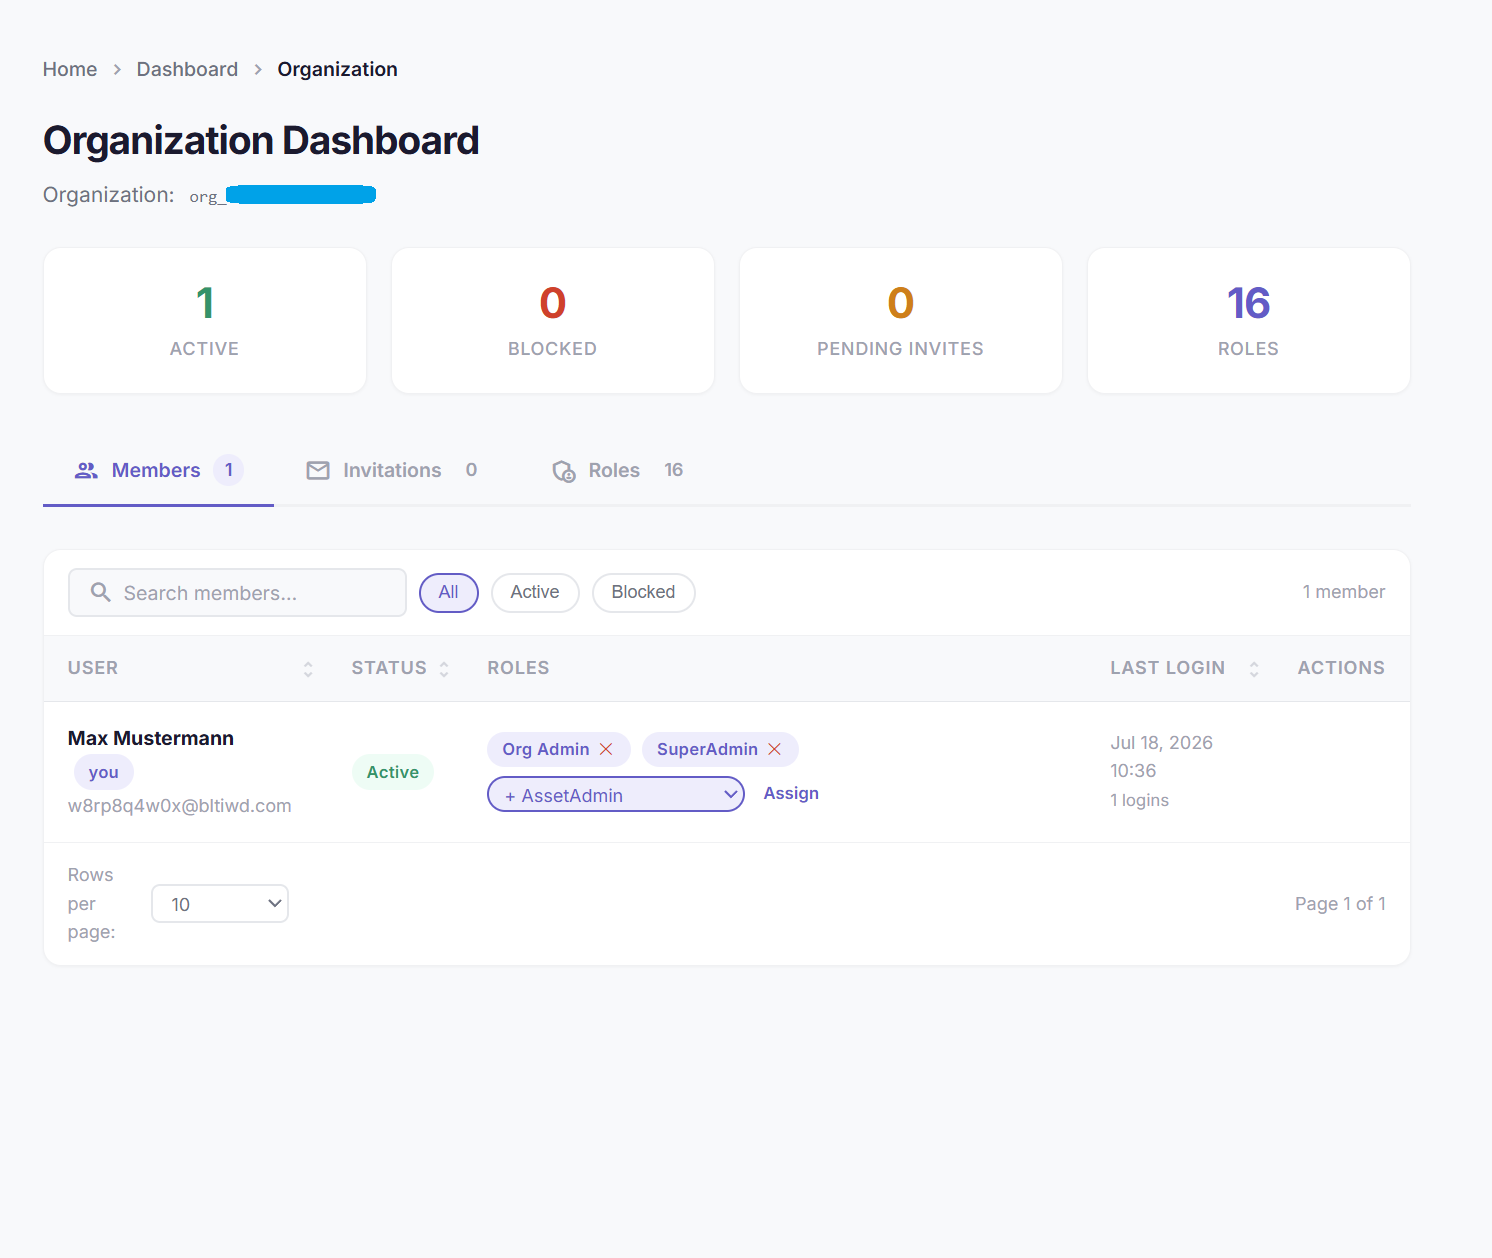
At the top, you will see four summary cards:
Card |
What it shows |
|---|---|
Active |
The number of currently active members |
Blocked |
Members who have been temporarily blocked from accessing phyHUB |
Pending Invites |
Invitations that have been sent but not yet accepted |
Roles |
The total number of roles available in your organization |
Below the cards, you will find three tabs: Members, Invitations, and Roles. You are currently listed as the only member, with the Org Admin and SuperAdmin roles already assigned to you.
Part B: Understanding the Dashboard Tabs
Members Tab
This tab lists everyone who has joined your organization. For each member, you can see:
Their name and email
Their current status (Active or Blocked)
The roles currently assigned to them
Their last login date and time
An Actions menu for managing their account
Invitations Tab
This is where you invite new colleagues. Any invitation that has been sent but not yet accepted will appear under Pending Invitations. Invitations expire after a set period – see Troubleshooting if a colleague’s invite has expired.
Roles Tab
This tab displays all available roles in your organization, along with a short description of what each role is intended for.
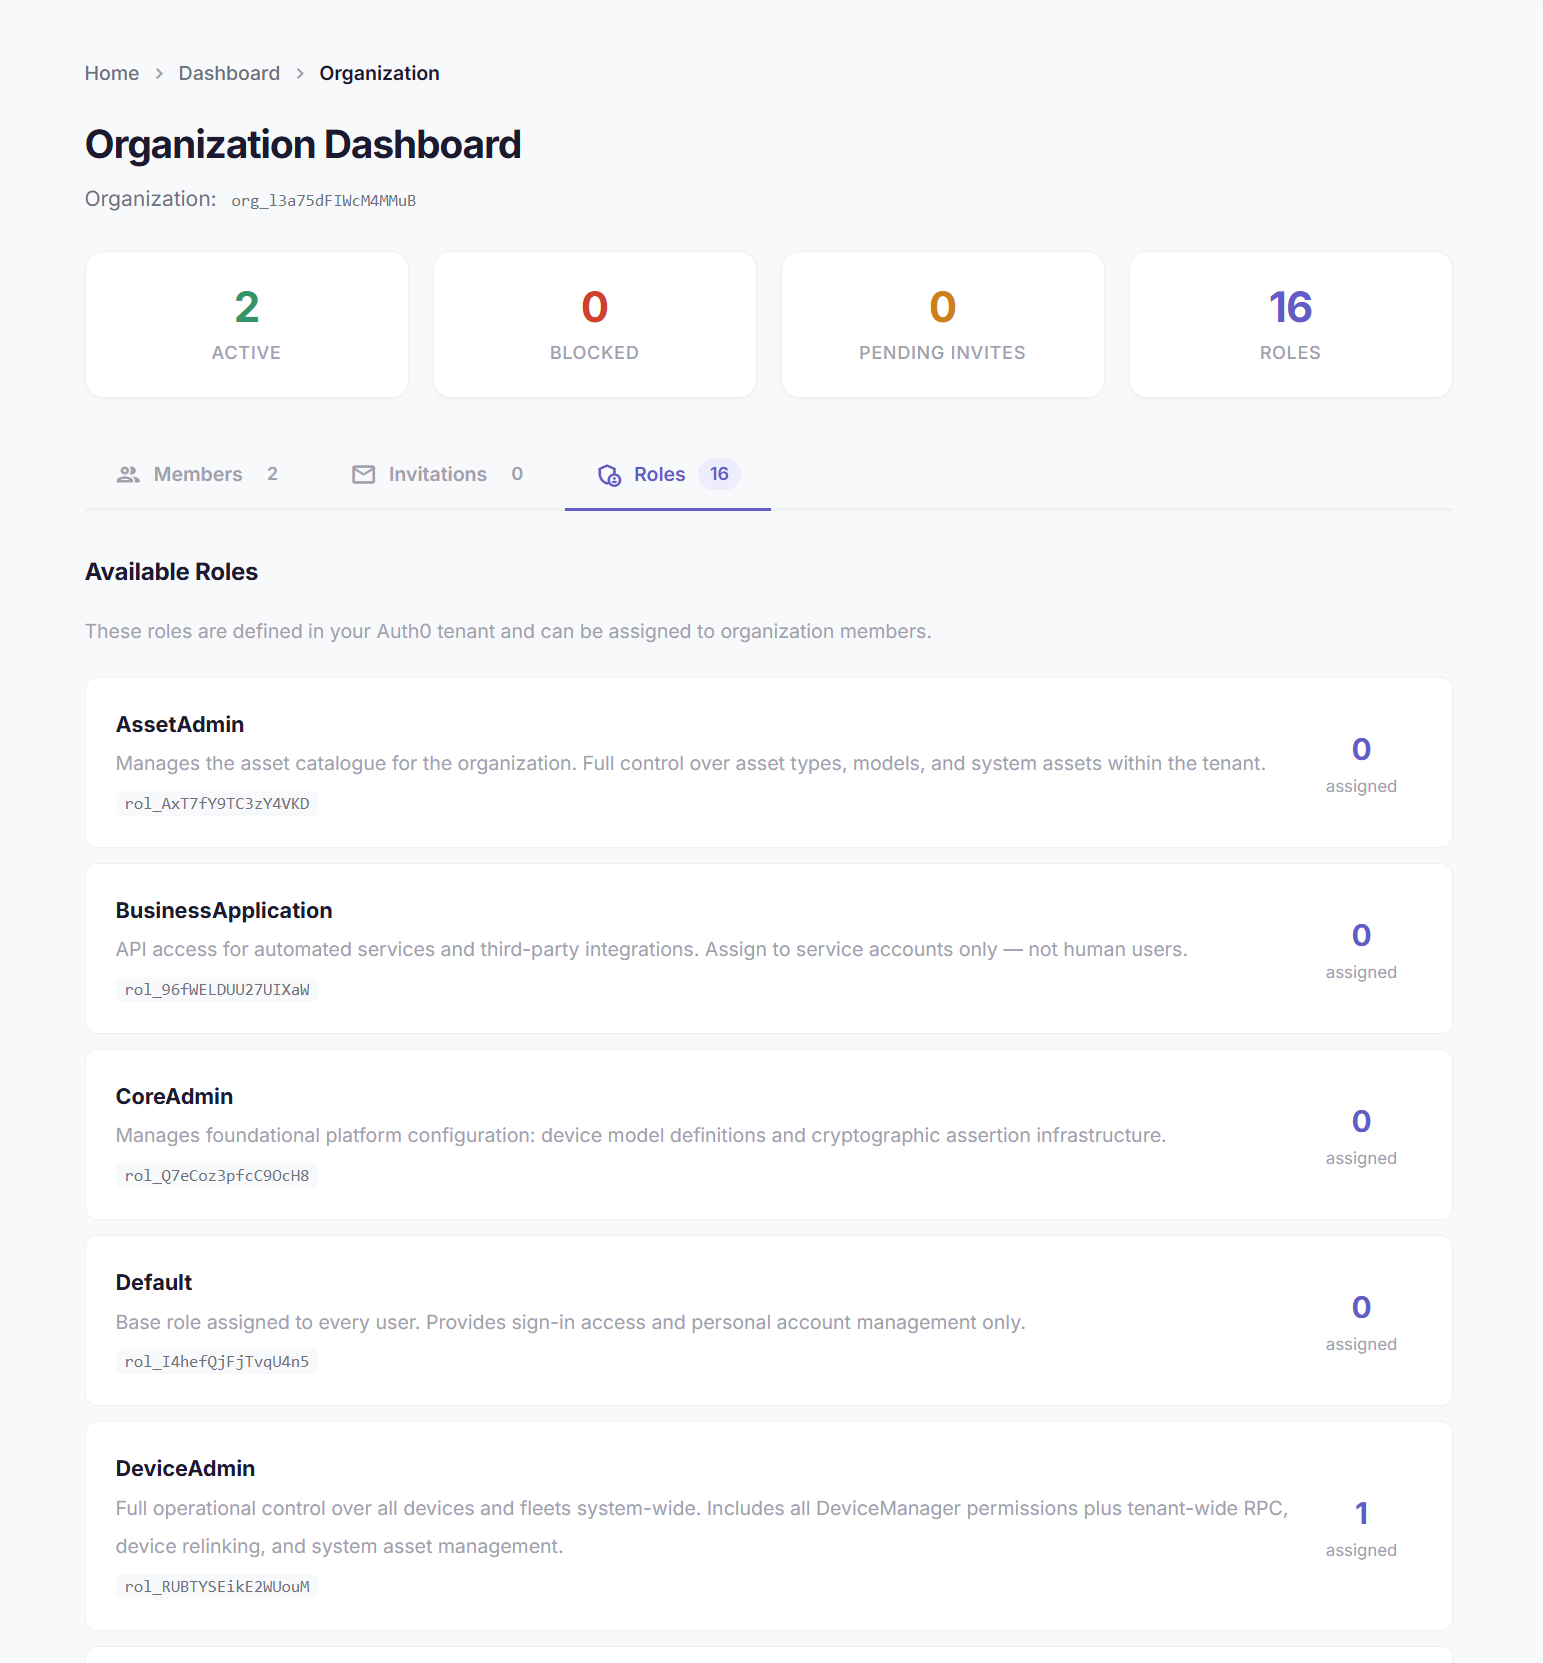
Use this tab whenever you need a reminder of what each role does before assigning it to a new team member. For a full breakdown of every role’s permissions and who it is designed for, refer to the Role Reference document.
Part C: Inviting Your Team
Once you are logged in, you can start bringing your colleagues on board. Each person must be invited individually.
How to Send an Invitation
Click the Invitations tab in the Organization Dashboard.
In the Send New Invitation section, enter your colleague’s work email address in the Email field.
In the Assign Roles section, tick the checkbox next to each role you want to give this person. You can assign more than one role.
Click Send Invite.
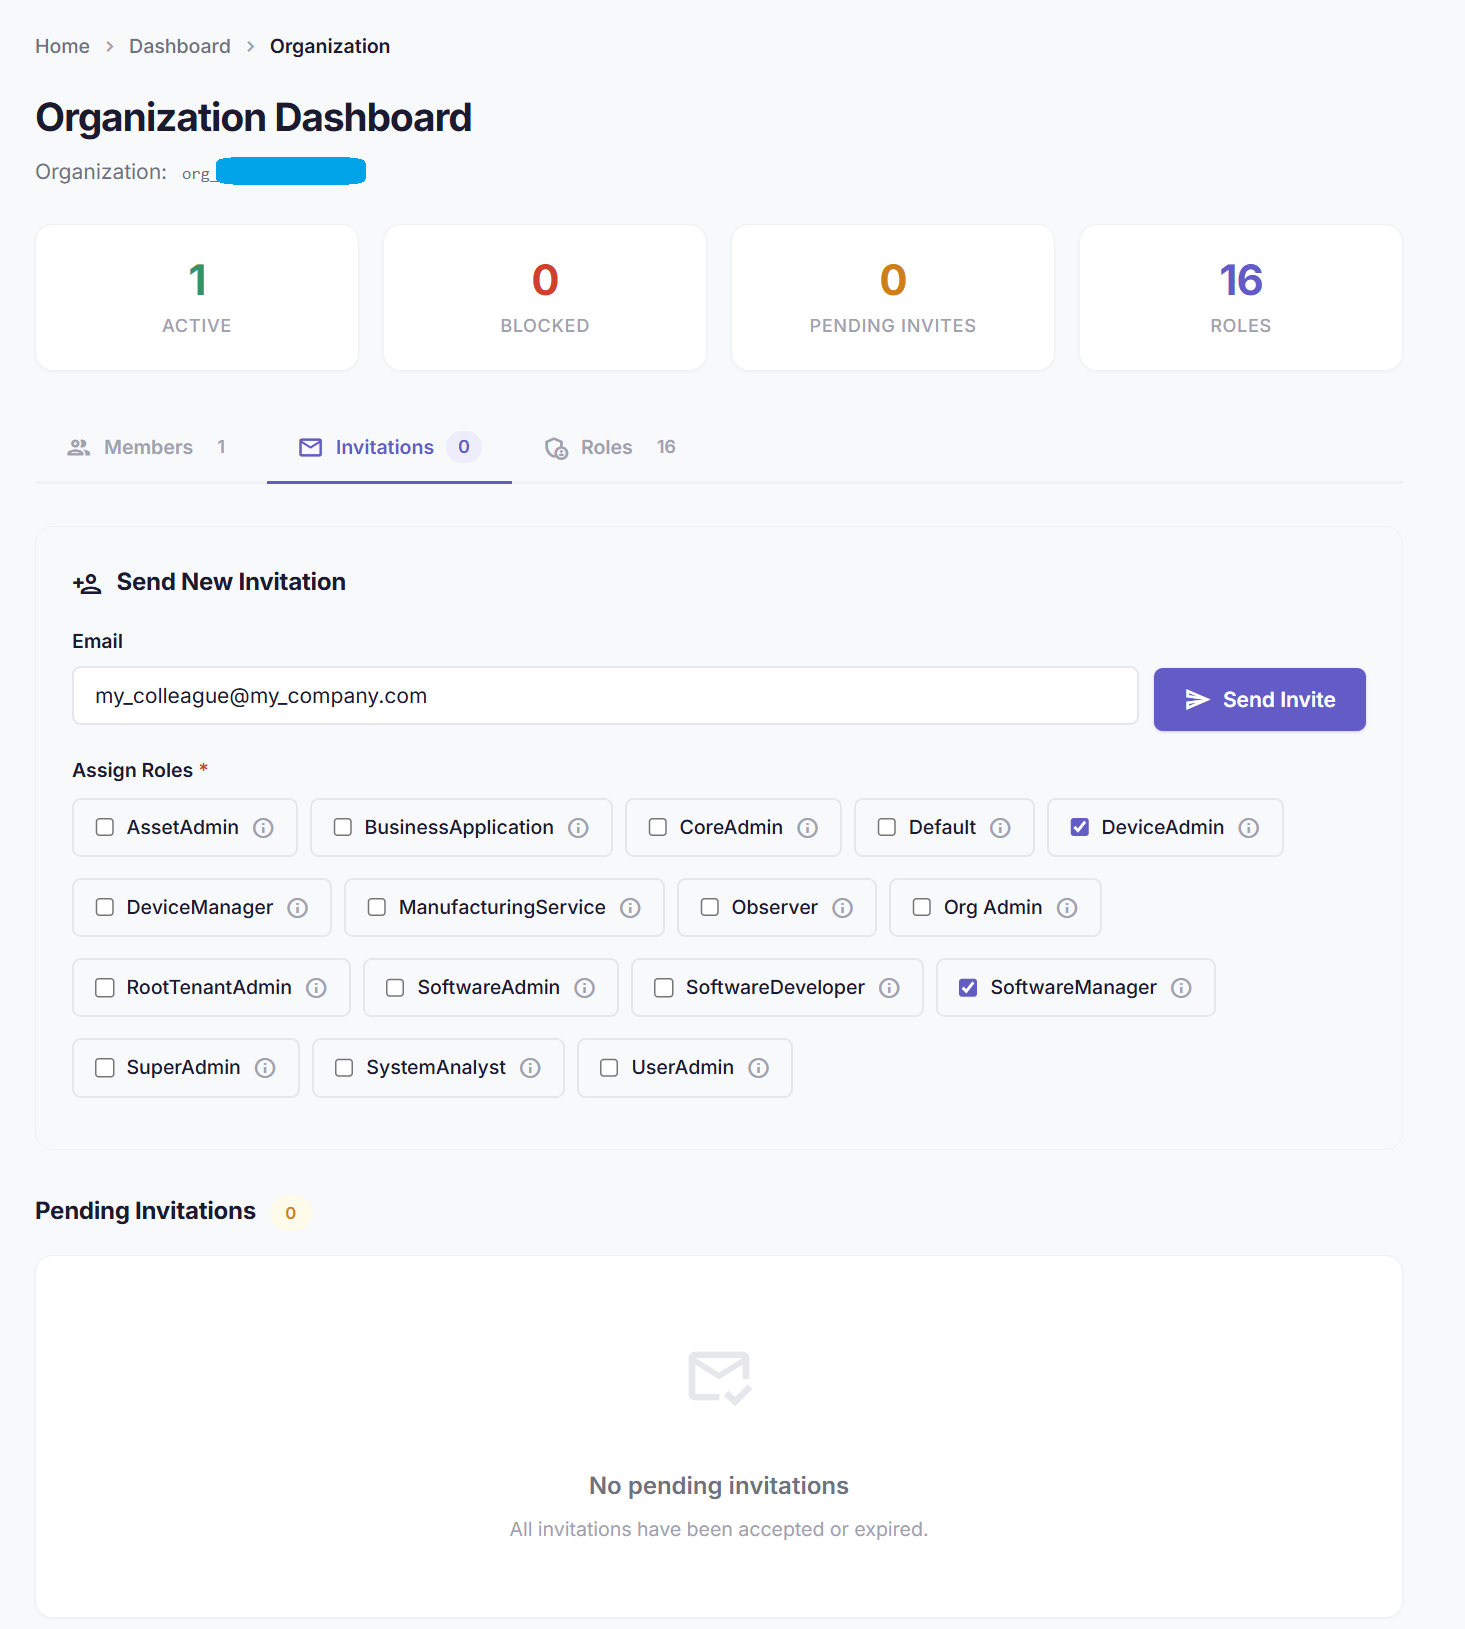
Your colleague will immediately receive an invitation email. The invitation will also appear in the Pending Invitations list until they accept it.
Choosing the Right Role
Not sure which role to assign? Here is a quick summary of the most commonly used roles:
Role |
Best for |
|---|---|
Observer |
Managers or stakeholders who only need to view information |
System Analyst |
Support or QA engineers who need to investigate issues |
Device Manager |
Field engineers who manage their own set of devices |
Device Admin |
Senior engineers who need full access to all devices |
Software Developer |
Engineers who build and test application packages |
Software Manager |
Release managers who review and approve software |
Software Admin |
Senior engineers managing the full software catalogue |
Asset Admin |
Inventory managers maintaining the asset catalogue |
User Admin |
IT administrators who manage users and roles |
Part D: What Your Invited Colleague Will Experience
Your colleague will receive an invitation email. Here is what they need to do.
Step 1: Accept the Invitation
Your colleague clicks the link in the invitation email. They are taken to a page that shows your organization name, their pre-filled email address, and a password field.
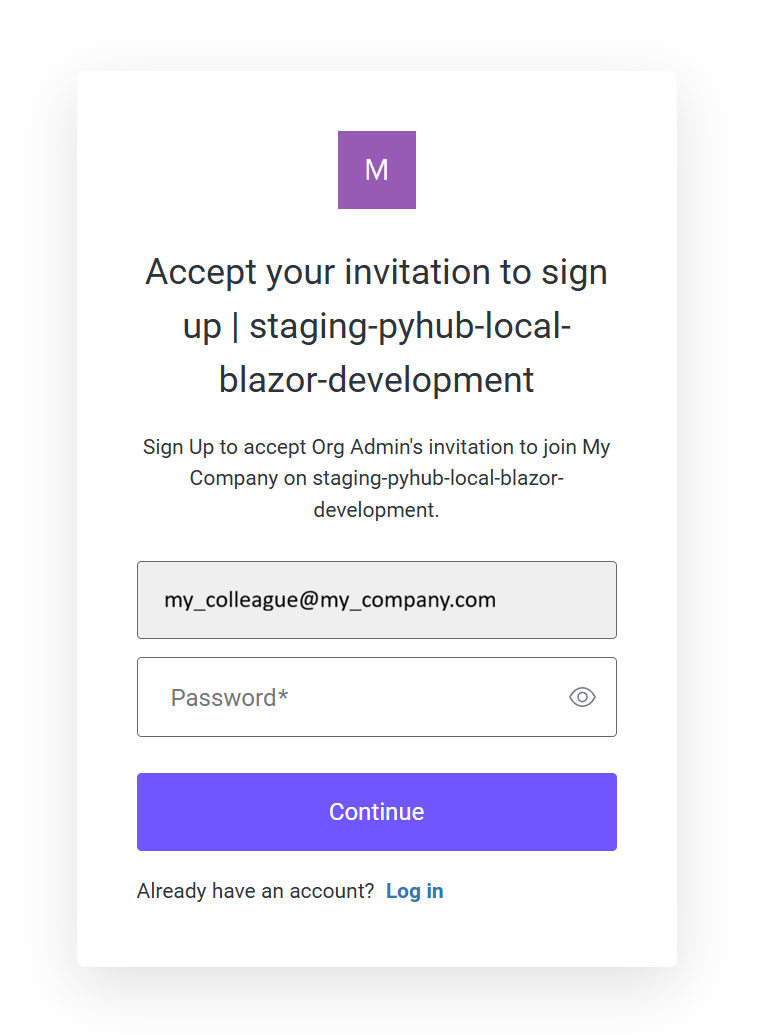
They enter a password and click Continue to proceed.
Step 2: Set Up Their Password
They are then taken to the Set your password page, where they choose a strong password following the same requirements outlined in Step 3: Set Your Password above.
After clicking Set Password & Continue, their account is created and they can log in to phyHUB immediately with the roles you assigned.
Note
Users cannot create an account on their own. If someone tries to go to the phyHUB login page and sign up without an invitation, they will not be able to join your organization. All access must be granted through the invitation process described here.
Part E: Managing Users Over Time
Reassigning or Adding Roles to an Existing Member
You can change a member’s roles at any time from the Members tab.
Find the member in the list.
In the Roles column, click the dropdown (shown as + [Role Name]) to see available roles.
Select a role to add it. The role is assigned immediately.
To remove a role, click the × next to the role name in their row.
Tip
Changes to roles take effect the next time the user performs an action or refreshes their session. For time-sensitive changes, ask the user to log out and log back in.
Blocking a Member
Blocking a member immediately prevents them from logging in to phyHUB, without permanently deleting their account. This is useful if someone is temporarily away, on leave, or if you need to suspend access while reviewing an issue.
Go to the Members tab.
Find the member you want to block.
Click Actions in their row and select the option to block them.
Their status will change from Active to Blocked.
To restore access, follow the same steps and choose to unblock them.
Removing a Member
If someone leaves the company or no longer needs access, you can remove them from your organization entirely via the Actions menu in the Members tab.
Note
Only the Organization Admin (or a User Admin) can block, unblock, or remove members.
Troubleshooting
The verification email never arrived
Check your spam or junk folder.
Make sure the email address you entered during registration was correct.
Some corporate email systems have strict filtering rules. Ask your IT department to whitelist emails from phyHUB’s sending domain.
If none of these help, contact the phyHUB support team to resend the verification email.
A colleague’s invitation link has expired
Invitation links are valid for a limited time. If your colleague clicks the link and sees an error saying it has expired:
Go to the Invitations tab in your dashboard.
Locate the expired invitation in the Pending Invitations list.
Cancel the old invitation if it is still visible, then send a fresh one by filling in their email address again.
A colleague says they cannot log in after accepting the invite
Check the Members tab to confirm their status shows as Active (not Blocked).
Confirm they are using the same email address the invitation was sent to.
Ask them to use the Forgot Password option on the login page to reset their password if they are unsure.
A colleague says they can log in but cannot access certain features
This is almost always a role issue. Go to the Members tab, find the colleague, and check which roles are currently assigned to them. Ensure the correct roles are set for what they need to do.