1. Installation
1.1. Product : Imx8mp
Before you start, make sure you have everything you need for setting up your device.
Required Items:
SD Card (and an adaptator if needed for your computer)
Power adapter (+24V)
Ethernet cable
USB-A to USB-B Micro Cable
[OPTIONAL] USB camera
For the display, you have two options:
Use an HDMI-connected screen
Use an LVDS screen with its cables
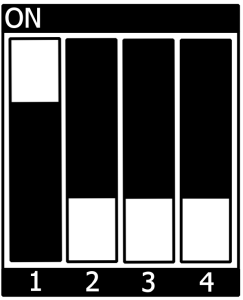
To begin, ensure that the Boot Mode DIP Switch (S3) is set to SD Card:
Follow these steps to get your board up and running:
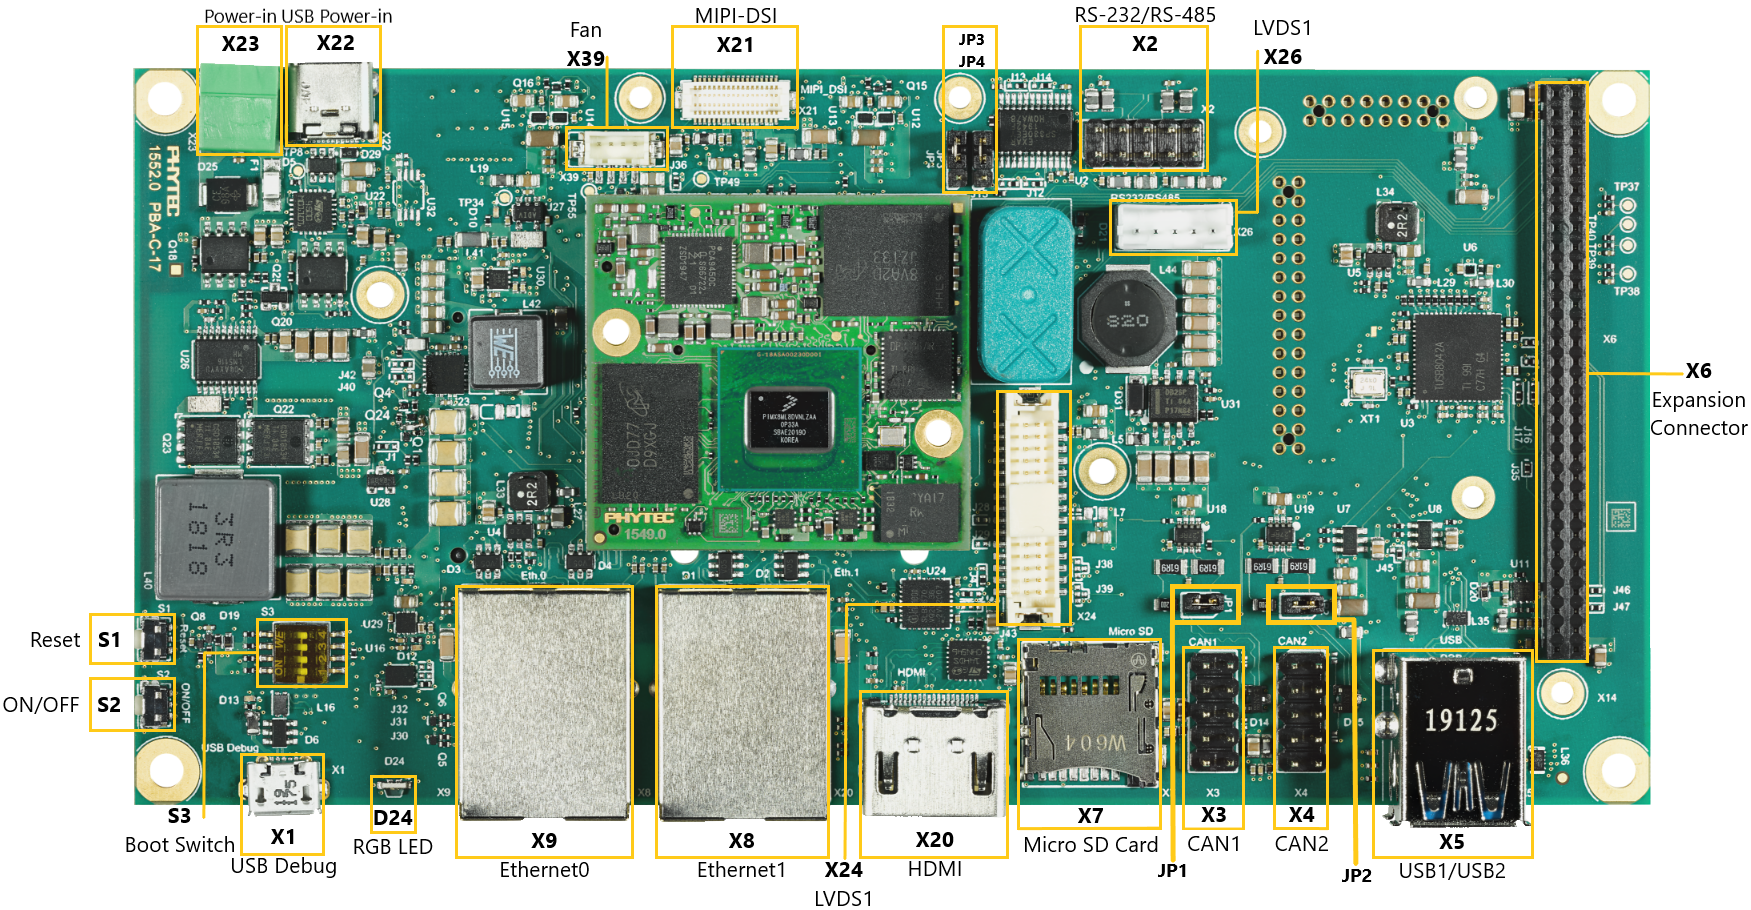
Connect the USB cable to your host PC and the Debug FTDI (X1).
Insert the Micro SD Card into the board (X7).
Connect the power adapter to the power supply connector (X23).
Turn on the power supply.
For detailed setup instructions, refer to the the i.MX8MP Product Documentation.
1.2. Downloading a Bootable Image on the SD Card
To get started, your board needs an image. Here’s how to download a pre-built image from Phytec to your SD Card.
First, download the pre-build image:
wget https://phytec/a_specific_folder/my_image_url.wic
You should now have a file named my_image_url.wic in your folder.
If you need to customize the image or add packages using Yocto, refer to the turotial First Steps with Yocto or check the PHYTEC documentation .
Once the file is downloaded on your computer, you need to copy it on the SD card. To do that, you first need to find the name of your SD Card.
On linux, you have two ways to find this name: dmseg or comparing the files in /dev before and after pluging the SD Card to the computer.
Once you have the name of your SD Card (for example mmcblk0), you need to unmount the partitions. The name of a partition is as follow: /dev/mmcblk0p1 with p1 indicating the first partition.
To unmount a partition use the following command:
unmount /dev/mmcblk0p1
Once ALL you partitons are removed, you can copy the image using the dd command:
sudo dd if=<my_image_url.wic> of=/dev/mmcblk0 bs=1M conv=fsync status=progress
You need to replace my_image_url.wic by the file downloaded previously.
WARNING Be very careful when selecting the right drive for the SD card ! Selecting the wrong one can erase your hard drive!
Your SD Card is now ready to be used ! To test your image, add your SD card and power the board. You should see the Linux logo and then a demo for kivy starting.
1.3. Getting connected to the target
There are two ways to connect to the board from your PC:
1.3.1. Serial Connection
To the target, you can use a connection. First check that your computer is linked to the board via the serial connector (X1: USB debug).
If it’s not present on you computer, install tio with the following command :
sudo apt install tio
Then to connect to the board, launch:
tio /dev/ttyUSB<num>
You need to replace the <num> part by your USB number. If you have any doubt check the number available with the following command:
$ cd /dev

$ find -name ttyUSB*
After connecting to the board with tio. You will see a line asking for a password.
By default, the password is root. Once you enter this password, you should be able to access to the board.
Congratulation, you are connected to your device !
1.3.2. Ethernet Connection
With an Ethernet connection, you can connect to the board using the ssh. You can also copy files from your computer to your device using scp.
To create this connection, first use an Ethernet cable to link your device and your PC.
You then need to setup manually the following information on your computer.
IP address |
Subnet mask |
Gateway |
|---|---|---|
192.168.3.10 |
255.255.255.0 or /24 |
192.168.3.10 |
You can do it on your own with the ifconfig or ip command.
Otherwise, here are the steps to configure the Ethernet connection on Ubuntu. If you are not using Ubuntu but want still stay close to this tutorial, you can install and use a PHYTEC Virtual Machine.
To configure the IPv4 device information on Ubuntu you need to:
Search “network” in the applications (Windows key to access the search bar on Ubuntu)
Select the Ethernet port used by the connection
Go to IPv4 setting
Select the
Manualmethod and add a new adress with the information available in the previous table.
To test the connection, you can do :
ping 192.168.3.11
WARNING Your device need to be turned on when you test your connection.
If you receive the packets of data then congratulation, you are connected !
1.4. Display
You need a display to render your graphic application. To setup the display with your board, you need to check the BSP Manual of your product.
For example, if you have a LVDS screen on a i.MX8MP boad, you need to modify the weston.ini file and restart your board.
You can find more information in the phyCORE-i.MX 8M Plus BSP Manual.
1.5. Sources
If you want to learn more on how to install the image on the board or how to configure the display, please check the phyCORE-i.MX 8M Plus BSP Manual.
If you are working on another product (for example the imx6) you can check the BSP Manual on the PHYTEC website.